Showing posts with label Nokia repairing. Show all posts

nokia 3100 line broken on the antenna switch

solution for nokia 3100 line broken on the antenna switch to antenna.


here is solution for nokia 3100 line broken on the antenna switch to antenna.


Nokia 3100 Repair | Nokia 3100 Services | Nokia 3100 Repairs | Nokia 3100 Schematic | Nokia 3100 Antena | Nokia 3100 Antena | Nokia 3100 Antena Jumper


NOKIA MOBILE, NOKIA GSM MOBILE, NOKIA GADGED, NOKIA HARDWARE, NOKIA SOFTWARE, NOKIA SCHEMATICS, NOKIA REPAIR, NOKIA JUMPER, NOKIA FLASH,

Nokia 7373 LCD Screen Repair

How to repair lcd screen?Now you can repair nokia phone lcd screen. Just do it.Its a easy way to repair nokia.
Nokia 7373 LCD Screen Repair

Nokia 3310, 3315, 3330, 3350, 3390, 3410, 5510 cell phones cable connector pinout

Nokia 3310, 3315, 3330, 3350, 3390, 3410, 5510 cell phones cable connector pinout for data/flash cable only

Pin
Number
Pin
Name
Direction Description
1 GND --- Ground
2 TX --> Data Transmission
3 MBUS <--> Control bus
4 RX <-- Data Recive
A Vbat
Voltage source
B

is battery type Li ion 74.5kohm to ground. NiMh 35Kohm to ground.
C BSI
battery thermistor. 25K to 40K
D Gnd --- Ground

Someone suggested another pinout for Nokia 3310: 1=MBUS; 2=GND; 3=RX; 4=TX

Nokia 3200_schematics Diagram

http://images.techtree.com/ttimages/story/nokia-3200.jpg

The Nokia 3200 is that you can create your own custom covers, using photos or your own design or artwork.The Nokia 3200 has an integrated digital camera, which you can use to take snaps, send to friends, download to your computer, or print and use to make your own cover design. The 3200 also has a built-in FM radio, as well as support for wallpaper, polyphonic ring tones and Java games, making it a good all-round fun phone.This is really a toy camera phone, and the new 3220 is a much better choice provided that you don't need the built-in radio.

Nokia 3200 may in case falls in some problems. Here is the Schematic diagram for this mobile.


Nokia 3200_schematic Diagram Download

Nokia 2600 rh-59.Schematics

http://www.prepaid-simcard.com/images/nokia-2600-classic.jpg
Nokia 2600 Classic was announced in the first quarter of 2008. At the first sight, the model is very bright. Nokia has tried to enliven the lineup, to add some color. However, the aspect of positioning shouldn’t be taken into account. Still the place of the modern child of the company is rather more modest. It represents a budgetary segment with broadened functionality. You should not think that Nokia 2600 Classic is a continuation of Nokia 2600. Looking on technical characteristics, arrangement of sockets and on the general proportions, it is possible to tell with confidence that we see renewed Nokia 2630.

The good: The Nokia 2600 has a functional feature set that includes Bluetooth and a VGA camera. Call quality was decent and the phone is easy to use.
The badThe bad: The Nokia 2600 has a painfully slow menu interface. Also, it suffers from a somewhat flimsy construction and the speakerphone quality is just average.

Download Nokia 2600 rh-59.Schematics

Nokia 2300-rm4-Schematics

http://images.techtree.com/ttimages/story/Nokia-2300.jpg
The Nokia 2300 is a very basic phone. The display is black and white with very low resolution, and there are few features. A radio is included, but it is mono only. One of the biggest problems with the 2300 is the weird keypad design that uses joined-up and overlapping keys. Not easy to use, not very reliable, and not recommended!
Actually the Nokia 2300 mobile phone is owned by my wife. I bought it as a birthday present for her. The result, I got more time to get hold of the phone to observed and have reviewed it. SMS upgrade has gone too far these days especially with Nokia phones. Superb audio quality can be expected from this phone. I like the way the polyphonic ringing tone sounds of this phone. They're distinctive and clear. You can download or compose melodies as well. The FM stereo radio is excellent. A stereo headset comes with the package, great for hands-free calls and music listening! I have no problem with the reception; it's always in full bars wherever I go. Just one or two keypresses and you can have the function you need. Of course not all functions, menus, and sub-menus are available in this feature. We all know that phones are getting smarter and smarter these days. And someday the function we thought just another trash of today, will one day just useful as technology advances and that would be also added in this feature. Over-all, the phone is a great improvement intended for low-end-users. If picture editor feature has been added in this phone, then it would surely surpass the performance of Nokia 33XX series, 2100, and 1100 phones respectively.
Download Nokia 2300-rm4-Schematics

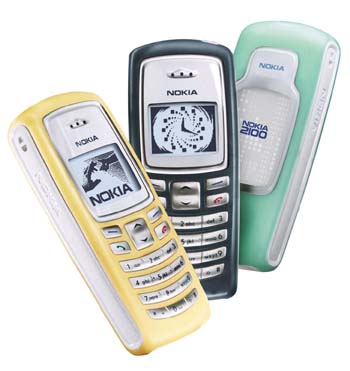
Nokia 2100-nam2-Schematcis

http://www.mobile-review.com/phonemodels/nokia/image/2100.jpg
Nokia makes its long awaited re-entry into the budget phone market with the new Nokia 2100. Is it good enough to dethrone the renowned Nokia 3315 as the budget phone of choice? Let's take a look and find out.

Measuring 105.5 x 44.2 x 20.7 mm, the phone is small in size, lightweight and easily fits in your pocket. It's got a cute and curvaceous design with no sharp edges. It has a changeable outer shell with a small section where you can insert a mid-sized photo of your loved one or yourself if you're egocentric enough. The keypad is comfortably placed in the front and the buttons are easy to reach, they feel soft and comfortable to press, and they are responsive enough for those high-speed SMS junkies. With its looks alone, the Nokia 2100 will appeal to college kids and girls who are on a lookout for a cute phone in a small budget.

Nokia 1100 schematic Free Download


The Nokia 1100 is designed with simplicity and reliability in mind. The main eature of the Nokia 1100 is its silicon keypad - easy-to-use and non-slip. The sides of the phone are also made of a non-slip material, so overall the phone is nice to hold and physically easy to use.This mobileis heavy strong and will not broken in case of fallen from hand. You will use this phon roughly where ever you want. Nice Mobie Nokia 1100 is one of the top selling phone ever made by Nokia.

Download Nokia 1100 Schematic(789.5KB)
User Guide For Nokia

Nokia 3310 LCD Interfacing

In this tutorial we will interface Nokia 3310 LCD with AT89C51.The Nokia 3310 LCD is based on a PCD8544 48x84 pixels matrix LCD controller.

Pin Diagram

Circuit Diagram

NOTE:Nokia 3310 LCD works on voltage level of 3.3v.To get this voltage level 10K resistor array, LED, diodes are used.

Few details

Display Data RAM (DDRAM)

The DDRAM is a 48x84 bit static RAM which stores the display data. The RAM is divided into six banks of 84 bytes (6x8x84 bits). During RAM access, data is transferred to the RAM through the serial interface. There is a direct correspondence between the X-address and the column output number.

Addressing

The columns are addressed by the address pointer. The address ranges are:

X 0 to 83 (1010011)

Y 0 to 5 (101)

Addresses outside these ranges are not allowed.

Horizontal addressing mode:

In the horizontal addressing mode, the X address increments after each byte. After the last X address (X = 83), X wraps around to 0 and Y increments to address the next row. After the very last address (X = 83 and Y = 5), the address pointers wrap around to address (X = 0 and Y = 0).

Lcd command list

21H: Activate Chip and H=1.

90H: Set Vop voltage (contrast)

13H: Adjust voltage bias.

20H: Horizontal addressing and H=0

09H: Activate all segments.

08H: Blank the Display.

0CH: Display Normal.

0DH: Inverse video mode

Y-ram address: 40H or (y and 07H)

X-ram address: 80H or (y and 7FH)

Serial Bus Protocol

Serial interface maximum 4.0 Mbits/s

The MSB of a byte is transmitted first.

The serial interface is initialized when SCE is HIGH. In this state, SCLK clock pulses have no effect and no power is consumed by the serial interface.

A negative edge on SCE enables the serial interface and indicates the start of a data transmission.

SDIN is sampled at the positive edge of SCLK. The level of the D/C signal is read during the last bit of data byte.

Convert BMP to HEX

1. Create bitmap image using MS Paint.

2. Go to Image/Attribute option

Set width: 88 and height: 48

Select unit: Pixels color: Black and white

3. Invert color

4. Rotate 270 degree.

5. Save as image.bmp

6. In command prompt go to directory where z_bmptohex.exe is saved.

7. In command prompt type z_bmptohex image.bmp

8. You will see that image_bmp.inc file is created having hex array of [88] [6]

9. Open image_bmp.inc file in notepad and delete first four rows of array so that you get [84] [6] matrix.

10. Copy this array and convert this file according to your assembler syntax and paste into your main program code.

Source code : Nok3310_code.asm

Output

Nokia n95 loose/wobbly slider fix

Ultimate nokia n95 loose/wobbly slider fix!


Someone may fix in a problem with one of the costest mobile of Nokia N95.To ones waiting for the 2nd batch of n95 with perfect sliders, really doubt that nokia will modify anything on the future n95 production. Because if they do so they will be legally obliged to call back all the n95 sold around the world and replace the phones or refund the customers.

No responsibility is taken for the correctness of this information.


The tools you need are:

-a t5 torx screwdriver
-some clear cello tape
-scissors
-a pair of tweezers or anything else as long as thinner than a finger nail. nothing sharp though!
-20min of your day
-and some courage!


lets understand why the n95 has got a loose/wobbly slider?

The following pictures will explain it to you pretty clearly;


so all we gotta do is to put some cello tape between the gap


Some n95 are more loose than the others so you gotta choose where to put the cello tape.

Options;

1. just a tiny bit loose
2. just a tiny bit loose but big gap under the "end" key
3. if its quite loose
4. if its motherF loose!


Results after putting the cello tape;

1. stiff slider
2. a very stiff slider
3. a super stiff slider
4. a mother F stiff slider

The process:

If you don’t want to do the job with oily fingers then wash your hands, switch off your phone, remove the battery cover, take the battery out and simply pop off the back cover. Look so easy:


then simply unscrew the 6 screws located on the side with your t6 screwdriver. During this process always hold the LCD part against the body.


Once unscrewed all the screws again by holding both the LCD part and the body together with your fingers and by using your nail pop off the metallic covers located on each side. Here is the metallic cover shown with an arrow:


here is what you are going to see underneath the metallic covers;


so here is the only part where you gotta be little care full. When slider in closed position simply lift slowly the LCD part of the phone from the body vertically! You are going to hear a little click, don’t worry nothing happened, its just the slider mechanism.

Then take off the plastic things located on each side and put the phone on a flat surface like a table lying on the LCD side.

Now its time to stick some cello tape on the inside of each plastic part;


like on this pic make sure that you stick the cello tape inside the curve properly; (this is where you are going to use the tweezers or something thin)


its time to cut properly the cello tape;


job done;


Its time to assemble the phone. first put back the LCD on the body, now click in left plastic part, then the right plastic part. But when putting back the plastic parts back in make sure that the sliding part of the LCD goes into the cello tape like this;


Put back the metallic covers and screws, then the cover and voila!

Check your slider? So feel much better doesn’t it? No more wobble! No more play! No more noise when pressing the navigation button!

Although there will still be a gap on the bottom side of the phone it wont wobble…


The slider has become very stiff but after a few days it would just be perfect. Try to play with it even 5 minutes of sliding it up and down will make a difference. lets say that you are unhappy with the stiffness in 3 days simply switch to another option by adding or removing some cello tape. Its advice you to start with option 1.

To help you slide the LCD part easier you may also stick a small silicon sticker similar to this one;


Personally went for the 3rd option although the slider on my 5th n95 was only a little bit loose.

Be aware Of The Caution.Nothing can go wrong if you follow exactly.

Repair Nokia 6100

Repair Nokia 6100

Controlling a Nokia 6100 Display with an Atmel-AVR
How to connect a Nokia LCD to a AVR-Controller.

The Display (which is used in Nokia 6100, 7210, 6610, 7250 and 6220) has a resolution of 132x132 Pxieln @4096 Colors. The visible area is about 3cm x 3cm in size. It can be found cheap at *bay. Note that there exist two types of Displays:

  • Green PCB: Epson S1D15G10 Chipset
  • Orange/Brown PCB: Philips PCF8833 Chipset

The provided Software does only work with Displays with the Philips chipset. If you want to use a Display with S1D15G10-chipset, take a look Externer Linkhere.

Hardware

I have used a AVR ATMega8 to control the Display.
The display works at 3,3V. I use a voltage divider (1.8k, 3.3k to GND) to convert the 5V signals of the controller to 3,3V levels for the display.

I directly soldered a ribbon cable on the back side of the display.


Pinout and connection to AVR:

1 VDD 3,3V
2 /Reset PB4
3 SDATA PB3
4 SCLK PB5
5 /CS PB2
6 VLCD 3,3V
7 NC
8 GND
9 LED-
10 LED+ (6V)
11 NC

no responsibility is taken for the correctness of this information.

Test

With the 8-Bit AVR Microcontroller i have build a rainbow-Animation, a simple oscilloscope and a Wireframe-3D-Engine:

Software

This Software can be compiled with AVR-GCC. It display a test picture first.
It is possible to upload a RAW-RGB-Image-File via the serial interface.

nokia_6100_display_test.zip (41 KB) -
Externer LinkPhilips PCF8833 Datasheet
Externer LinkEpson S1D15G10 Controller, with an ATMEL AVR ATMega32L

Caution : Beaware no responsibility is taken for the correctness of this information.

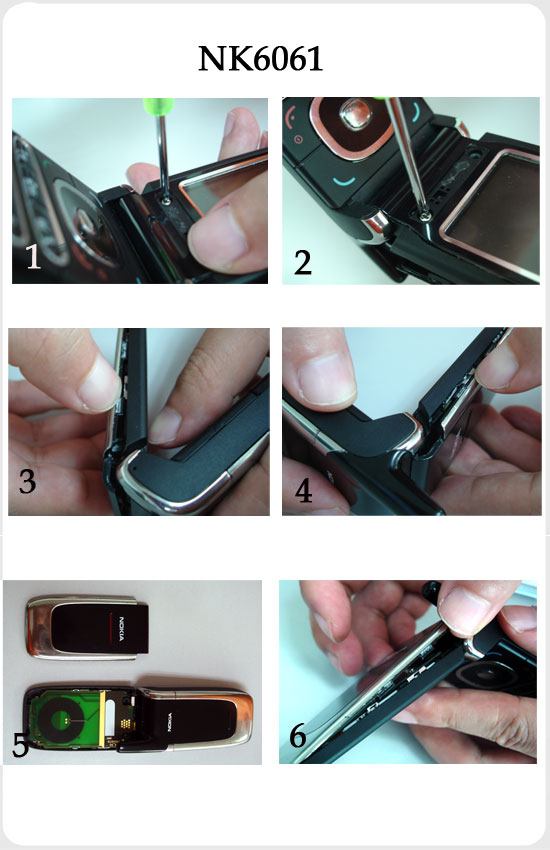
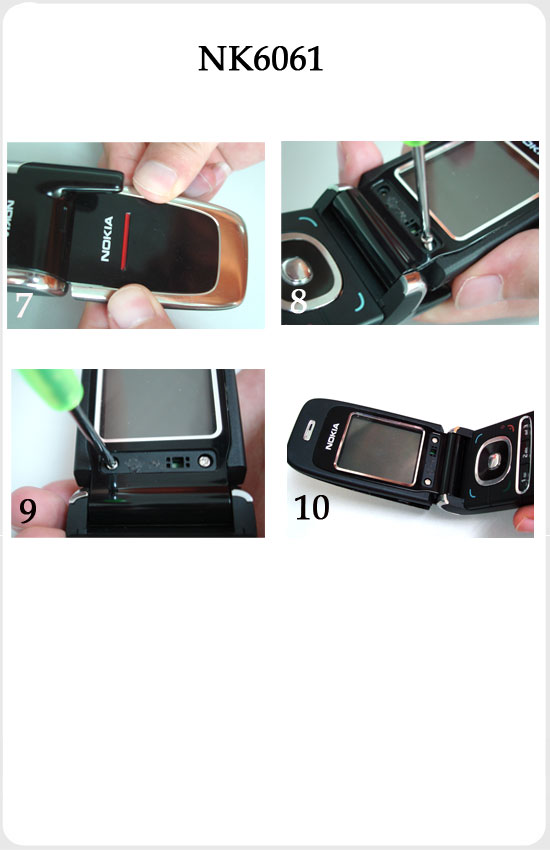
NOKIA-6061 Protector Case

NOKIA6061 Protector Case

NOKIA-6061 Protector Case


Beleuchtungs-Dimmer

Beleuchtungs-Dimmer

Ein Dimmer ist in neueren Geräten schon zum Standard geworden. Doch auch ältere Modellen kann man die LEDs zum dimmen bringen.

Den Dimmer kannst du entweder hardwaremäßig mit eineigen Bauteilen für dein Handy realisieren. Stelle dazu vorher sicher, dass du den benötigten Platz im inneren deines Handys findest, wo du die Bauteile unterbringen kannst!

Anderseits kannst du eine Software-Funktion einfügen, womit du die LED-Ansteuerung softwaremäßig regelst und somit eine Dimm-Funktion erhältst.

» Dimmer im Nokia 3210:

Benötigt werden folgende Bauteile:

  • Diode BAT43
  • Kondensator 100 µF
  • Kondensator 22 µF
  • Transistor BC817
  • Widerstand 4,7 kOhm
  • Widerstand 10 Ohm (2x)

Die Bauteile kannst du z.B. in der Mulde für den Vibrations-Motor verbauen. Falls dieser durch den Motor belegt ist, können die teile auf in verschiedenen Stellen untergebracht und verlötet werden.

Als verwendeter Kondensator kann wahlweise auch ein z.B. 4,7µF-Kondensator verwendet werden.

Der Widerstand (hier: 4,7KOhm) bestimmt die Dimm-Verzögerung. Desto kleiner der Widerstand ist, desto kürzer ist die Dimmphase!

» Dimmer im Nokia 3310, 3330, 3410, 5510:

Benötigt werden folgende Bauteile:

  • Diode BAT43
  • Kondensator 100 µF
  • Kondensator 22 µF
  • Transistor BC817
  • Widerstand 4,7 kOhm
  • Widerstand 47 kOhm

Als verwendeter Kondensator kann wahlweise auch ein z.B. 4,7µF-Kondensator verwendet werden.

Der Widerstand (hier: 4,7KOhm) bestimmt die Dimm-Verzögerung. Desto kleiner der Widerstand ist, desto kürzer ist die Dimmphase!

» Dimmer im Nokia 5110, 5130, 6110, 6150:

Benötigt werden folgende Bauteile:

  • Diode BAT49
  • Kondensator 100 µF
  • Widerstand 470 Ohm (2x)
  • Widerstand 2,2 kOhm (2x)
  • Widerstand 1,5 Ohm (2x)

Die Bauteile liegen am unteren Rand der Tastatur-Platine.

Entferne zuerst die zwei Widerstande, so dass die Lötpads frei liegen. Dann kannst du die Schaltung an löten und die Bauteile am unteren Rand unter dem Cover unterbringen.

» Dimmer im Nokia 6210, 6250:

Benötigt werden folgende Bauteile:

  • Diode BAT43 oder BAT49
  • Kondensator 22 µF

Die Bauteile befinden sich auf der Platine neben dem SIM-karten-Halter, am äußeren Rand der Platine.

» Dimmer im Nokia 7110:

Benötigt werden folgende Bauteile:

  • Diode BAT43 oder BAT49
  • Kondensator 100 µF / 4V

Die Bauteile befinden sich auf der Platine neben der Backup-Batterie.

 
Mobile Phones Blog | Features,Concepts,Applications and Prices © 2012 | Designed by Cheap TVS, in collaboration with Vegan Breakfast, Royalty Free Images and Live Cricket Score