Showing posts with label Mobile Repairing. Show all posts

Dual-booting Mer on Nokia N900

As of Mer 0.17testing10 we have an image that is fairly easy to try out on Nokia N900. This guide is for advanced users and there is NO WARRANTY. It might turn your N900 back into the crazy guy from this video or chew out your microSD, so be careful.

You will need:
* A microSD
* A SD/microSD card reader for your PC
* A Linux installation on your PC.
* A copy of a Mer rootfs for N900 (0.17testing10)
* A copy of the files in your /lib/firmware from your N900. This includes WiFi and Bluetooth firmware.
* PR1.0, PR1.0.1 or PR1.1 on your N900
* That you have installed fanoush's bootmenu (dpkg -i it and run 'Install bootmenu' application icon)

Instructions (must all be done as root):
* Partition your microSD to first partition being Linux and format it as ext3 using mkfs.ext3.
* Mount the ext3 partition on your PC, let's say in /mnt/mer.
* Make sure using 'mount' that your ext3 partition is -not- mounted 'nosuid' or 'nodev'
* cd /mnt/mer
* tar --numeric-owner -pzxf /full/path/to/
mer-armel-n900-rootfs-v0.17testing10.tar.gz
* cd lib/firmware
* cp in the files from /lib/firmware from your N900
* umount /mnt/mer
* Make a file "mer.item" in /etc/bootmenu.d on your N900, containing:

ITEM_NAME="Mer (external SD, partition 1)"
ITEM_ID="mer"
ITEM_DEVICE="${EXT_CARD}p1"
ITEM_MODULES="mbcache jbd ext3"
ITEM_FSTYPE="ext3"
ITEM_FSOPTIONS="noatime,ro"

* Reboot your device, have the keyboard slid out. A bootmenu will appear where you can select Mer with the cursor keys.
* Mer booting.. wait for touchscreen calibration step
* And then you can run through the first boot wizard
* And a non-accelerated Mer desktop appears.

What works:
* WiFi
* Touchscreen
* Charging
* Watchdog handling

Of closed source blobs used in Mer (for N900):
* DSME (open source) with libcal (closed source) running from the Maemo5.0 rootfs
* BME running from the Maemo5.0 rootfs
* Firmware files for WiFi and Bluetooth chip amongst others.

Either way, I hope you enjoy playing with an alternative OS on your N900. Feel free to report bugs at http://wiki.maemo.org/Mer/Releases/0.17 and talk to us on #mer on irc.freenode.net if you'd like to contribute to Mer.

nokia 3100 line broken on the antenna switch

solution for nokia 3100 line broken on the antenna switch to antenna.


here is solution for nokia 3100 line broken on the antenna switch to antenna.


Nokia 3100 Repair | Nokia 3100 Services | Nokia 3100 Repairs | Nokia 3100 Schematic | Nokia 3100 Antena | Nokia 3100 Antena | Nokia 3100 Antena Jumper


NOKIA MOBILE, NOKIA GSM MOBILE, NOKIA GADGED, NOKIA HARDWARE, NOKIA SOFTWARE, NOKIA SCHEMATICS, NOKIA REPAIR, NOKIA JUMPER, NOKIA FLASH,

Nokia 3100-3120_schematics Diagram

http://www.cellcables.com/prodimages/Nokia3100-3120-6100.jpg
Nokia 3210 is a great handset.Small size, easy functionality. I don't need a lot of features but adding and deleting contacts, etc. is very simple. The battery seems to be even better than the 3595 and I only charged that one about once every 3-4 days. The photo on this website does not do this phone justice, it is actually quite small. This overall phone is very sturdy.

Nokia 3100 is one of the best selling phone of Nokia Great reception through ATT Wireless (now Cingular). This phone has great clarity and the battery life is good for a free phone. Head to head with my roommates Motorola through the same carrier. My phone has reception throughout my house compared to her's which disconnects. This phone has sustained many falls and slides on pavement and it still has not let me down.

For the cons about this phone. Sometimes depending on who calls me and through which carrier, full volume isn't loud enough and the vibrate doesn't vibrate as hard as some other phones.

Overall this phone is a great deal for someone who doesn't want all those fancy gadgets that you have to pay extra to use. The phone fits in my little right jean pocket. None of the flip phones out there can fit in my little right jean pocket and people still comment on how small it is. I have yet to find a suitable replacement for this phone. A phone that can fit into my little right jean pocket.

This is one of the simplest to use phones on the market. It is a no nonsense phone for those who simply want to make and receive calls and text messages. As with all Nokia phones the functionality is easy to navigate, the design is simple and it is a good looking phone too. It is a good size with well laid out buttons that are easy to use. Overall it is a great little phone and very good value for money. This phone is not fo you if you like lots of gizmos and gadgets.
Attached Files

Nokia 3100 and 3120 Schematic Diagram

and cable
File Type: zip nokia 3100 and 3120.zip (242.1 KB)
File Type: zip 6100-3100-3120_cable.zip (11.4 KB)

Download Nokia 3100-3120_schematics

Sony Ericsson Mobile Fault Prevention

Sony Ericsson Mobile have some faults as circuit problems, joysticks problems, camera problems, turning off, jumper, buttons, network etc.


Sony ericsson J200i mic soluition can be prevented through this diagram


Sony ericsson K300 Keypad Joystick if creating problem then it can be solved according to diagram


Sony ericsson v200 camera repair


Sony ericsson k700i joystick repairing


Sony ericsson k700 not turnig off


Sony ericsson k300 k 310 k320 mic track problem solution jumper diagram one


Sony Ericsson k750 w800 w810 display white light problem solution pcb circuit diagram


Sony ericsson k700mic_2 repairing


Sony ericsson k700i_joystick fault repairing

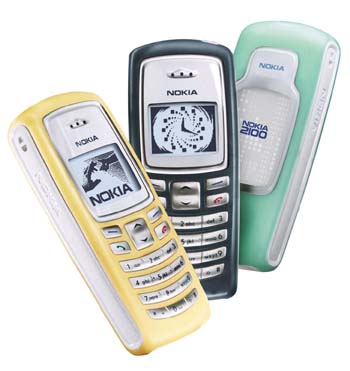
Nokia 2100-nam2-Schematcis

http://www.mobile-review.com/phonemodels/nokia/image/2100.jpg
Nokia makes its long awaited re-entry into the budget phone market with the new Nokia 2100. Is it good enough to dethrone the renowned Nokia 3315 as the budget phone of choice? Let's take a look and find out.

Measuring 105.5 x 44.2 x 20.7 mm, the phone is small in size, lightweight and easily fits in your pocket. It's got a cute and curvaceous design with no sharp edges. It has a changeable outer shell with a small section where you can insert a mid-sized photo of your loved one or yourself if you're egocentric enough. The keypad is comfortably placed in the front and the buttons are easy to reach, they feel soft and comfortable to press, and they are responsive enough for those high-speed SMS junkies. With its looks alone, the Nokia 2100 will appeal to college kids and girls who are on a lookout for a cute phone in a small budget.

Nokia 3310 LCD Interfacing

In this tutorial we will interface Nokia 3310 LCD with AT89C51.The Nokia 3310 LCD is based on a PCD8544 48x84 pixels matrix LCD controller.

Pin Diagram

Circuit Diagram

NOTE:Nokia 3310 LCD works on voltage level of 3.3v.To get this voltage level 10K resistor array, LED, diodes are used.

Few details

Display Data RAM (DDRAM)

The DDRAM is a 48x84 bit static RAM which stores the display data. The RAM is divided into six banks of 84 bytes (6x8x84 bits). During RAM access, data is transferred to the RAM through the serial interface. There is a direct correspondence between the X-address and the column output number.

Addressing

The columns are addressed by the address pointer. The address ranges are:

X 0 to 83 (1010011)

Y 0 to 5 (101)

Addresses outside these ranges are not allowed.

Horizontal addressing mode:

In the horizontal addressing mode, the X address increments after each byte. After the last X address (X = 83), X wraps around to 0 and Y increments to address the next row. After the very last address (X = 83 and Y = 5), the address pointers wrap around to address (X = 0 and Y = 0).

Lcd command list

21H: Activate Chip and H=1.

90H: Set Vop voltage (contrast)

13H: Adjust voltage bias.

20H: Horizontal addressing and H=0

09H: Activate all segments.

08H: Blank the Display.

0CH: Display Normal.

0DH: Inverse video mode

Y-ram address: 40H or (y and 07H)

X-ram address: 80H or (y and 7FH)

Serial Bus Protocol

Serial interface maximum 4.0 Mbits/s

The MSB of a byte is transmitted first.

The serial interface is initialized when SCE is HIGH. In this state, SCLK clock pulses have no effect and no power is consumed by the serial interface.

A negative edge on SCE enables the serial interface and indicates the start of a data transmission.

SDIN is sampled at the positive edge of SCLK. The level of the D/C signal is read during the last bit of data byte.

Convert BMP to HEX

1. Create bitmap image using MS Paint.

2. Go to Image/Attribute option

Set width: 88 and height: 48

Select unit: Pixels color: Black and white

3. Invert color

4. Rotate 270 degree.

5. Save as image.bmp

6. In command prompt go to directory where z_bmptohex.exe is saved.

7. In command prompt type z_bmptohex image.bmp

8. You will see that image_bmp.inc file is created having hex array of [88] [6]

9. Open image_bmp.inc file in notepad and delete first four rows of array so that you get [84] [6] matrix.

10. Copy this array and convert this file according to your assembler syntax and paste into your main program code.

Source code : Nok3310_code.asm

Output

Interfacing Alphanumeric LCD

This page will let you learn a very easy tutorial on interfacing alphanumeric LCD.I opted for interfacing LCD with parallel port using visual basic 6 programming.With ease of programming in graphical user interface environment and its event driven nature makes this project more innovative.Working with DLL files in visual basic is easy as compared to C++ for programming parallel port.Before staring with Visual Basic 6 programming one should be clear with the concepts of the parallel port.Refer this link Parallel port tutorial
Lcd used here has HD44780u dot matrix lcd controller.

Connection Diagram:

Caution:Make sure that 5V and GND lines are properly connected otherwise you may end up in damaging parallel port.

If you want backlight than connect pin 15 of LCD to 5V and pin 16 of LCD to GND. By adjusting 10k resistor make pin 3 of LCD at 0V. If connection are proper you will see this after power on.

LCD Video

Pin Information of LCD:

Algorithm to send data to LCD:

1.Make R/W low

2.Make RS=0 ;if data byte is command

RS=1 ;if data byte is data (ASCII value)

3.Place data byte on data register

4.Pulse E (HIGH to LOW)

5.Repeat the steps to send another data byte

LCD Initialization:

This is the pit fall for beginners.Proper working of LCD depend on the how the LCD is initialized. We have to send few command bytes to initialize the lcd. Simple steps to initialize the LCD

1.Specify function set:

Send 38H for 8-bit,double line and 5x7 dot character format.

2.Display On-Off control:

Send 0FH for display and blink cursor on.

3.Entry mode set:

Send 06H for cursor in increment position and shift is invisible.

4. Clear display:

Send 01H to clear display and return cursor to home position.


NOTE:One must refer the datasheet of LCD to get the proper time delay and required sequence.

Major hurdle in accessing parallel port in Windows Xp is the knowledge of using inpout32 files.

Download : Driver files

Now save inpout32.dll and port.dll in system32 folder in windows directory.We will use certain subroutine provided by these dll files in our VB6 code.Open new project in VB6 and create the form as shown below.

Set the max length of two text boxes to 16.Create "Start" and "Clear" command button.Add visual basic code to form.

Visual Basic Code

Dim data As Variant

Private Sub Clear_Click()
LowRs
Out Val(&H378), Val(1) ' function to send data to parallel port
Enable
txtlcd1.Text = " " ' line 1 for LCD
txtlcd2.Text = " " ' line 2 for LCD
End Sub

Private Sub Start_Click()
Out Val(&H37A), Val(Inp(&H37A) And &HDF)
lcd_int
LCDWriteString txtlcd1.Text
next_line ' function to set cursor to second line
LCDWriteString txtlcd2.Text
End Sub

Sub LowRs()
Out Val(&H37A), Val(Inp(&H37A) Or &H8) ' Rs Low
End Sub


Sub LowEn()
Out Val(&H37A), Val(Inp(&H37A) Or &H1) ' En Low
End Sub

Sub HighRs()
Out Val(&H37A), Val(Inp(&H37A) And &HF7) ' Rs High
End Sub

Sub HighEn()
Out Val(&H37A), Val(Inp(&H37A) And &HFE) ' En High
End Sub

Sub lcd_write(data%)
HighRs
Out Val(&H378), Val(data)
Enable
End Sub

Sub next_line()
LowRs
Out Val(&H378), Val(&HC0)
Enable
End Sub


Sub lcd_int() 'subroutine to initialize LCD
LowRs
Out Val(&H378), Val(&H38)
Enable
LowRs
Out Val(&H378), Val(&HC)
Enable
LowRs
Out Val(&H378), Val(&H6)
Enable
LowRs
Out Val(&H378), Val(&H1)
Enable
End Sub


Sub Enable()
DELAYUS 20000
HighEn
DELAYUS 2000
LowEn
DELAYUS 2000
End Sub

' function to send ASCII character one by one to LCD
Public Sub LCDWriteString(ByVal OutStr As String)
Dim i As Integer 'write a string to LCD
For i = 1 To Len(OutStr)
lcd_write (Abs(Asc(Mid(OutStr, i, 1))))
Next i
End Sub

Now go to Project>Add Module .Select inpout4.bas and port.bas

Subroutine Out Val (&address),Val(data) and DELAYUS 2000 is available in inpout4.bas and port.bas respectively.

Running the Program:

1.Press F5 to run the program

2.Write the text you want to display on the LCD in the textboxes

3.Click "Start" command button.

4.You will see that the same text appears on LCD as shown in the textboxes.

5.To send other text click "Clear" command button and repeat the same procedure.

General problem solving Nokia mobile


2100 insert SIM : CCONT/CPU problem
3210 Always shows charging : reflow or replace CCONT
3310 Signal is normal,but no TX : Reflow/Replace CCONT,COBBA, check Antenna Switch

3310 No response to charger : Check fuse F200
3310 No Signal : hagar, c508, L511(remove it) , PA

3310 Signal OK when first turned on then dissapears : Replace PA, reflow cobba,ccont,hagar

3310 Battery OK until call then low : Reflow/Replace CCONT, Replace PA
3310 Keys mixed up : Replace R414 and / or R415 (each 2 x 1k)

3310 Will not power up after turned off unless batt removed and replaced : replace / reflow CCONT
3310 Will charge OK but will not power ON : reflow/replace CCONT or check V202
3310 "Insert Sim": If its is not a SIM-connector problem then usually reflow

/ replace CCONT
3310 Standby 1 day or less : PA
3310 Intermittent reboots or turns off: Remove L511
3310 LCD displays lines or alternate lines missing etc: Resolder C409 & C410,if no

display replace c409,c410,c412,c413
3510 can't charge : Try to change UEM

5210 no speaker : COBBA problem

7210 no ringer : reset phone settings

7650 no ring sound : change ringer

8210 Signal OK but No TX: Reflow Cobba, Reflow Hagar, replace Antenna Switch,

replace PA
8210 Signal OK when first turned on then dissapears: Replace Antenna switch,

reball COBBA,B 100 crystal
8210 No signal unless IR active: Change C153
8210 Vibe and Light stay on:Replace User-Iterface IC (adjacent to power switch)
8210 "Not Charging" : rebal/replace CCONT,charging IC or remove V100, near F101

8210 CONTACT SERVICE : COBBA problem(rabal/replace),try to flash phone

8210 No response to charger: Check F101

8210 Will charge OK but will not power ON: reflow/replace CCONT,or V116

8210, 8250 Locks-up, freezes: Update software, Reflow MAD (Caution, Toxic glue!)

8210/8250 show charging but no charging : check CCONT,line from c!=% near

chaps to +,change N401

8210 showing charging without charger : Check CCONT and CHAPS (Charge IC)
6210, 3310 etc Int' drops network: replace Ant' switch, reflow COBBA

6210, 3310 etc Int' drops network and rintones slow: Replace 32khz crystal

8310, 6510 No response to charger: Check Fuse F100
8310, 6510 One or some keys not working: Replace Z301
8310, 6510 no ring tone : When phone software is old,flash phone with new

version of software

8890 no signal after flash : update faid and unlock
Problem socket server in my nokia phone

Hi everybody I introduce myself i am: White Tiger ^_^...
Then, I have made a program client (PC) server (Cell), but the server blocked:


import socket
sockfd = socket.socket(socket.AF_BT, socket.SOCK_STREAM)
port = socket.bt_rfcomm_get_available_server_channel(sockfd._sock)
sockfd.bind(('', port))
socket.bt_advertise_service( u"XYZ", sockfd._sock, True, socket.RFCOMM)
socket.set_security(sockfd._sock, socket.AUTHOR)
sockfd.listen(1)
connection, address = self.sockfd.accept()
while 1:
(crash here)
data = connection.recv(100)
......

if the client it is the shell of python, the server works, if the client is a script, the server not works.
In order to resolve the problem I have made in the following way:

import socket
sockfd = socket.socket(socket.AF_BT, socket.SOCK_STREAM)
port = socket.bt_rfcomm_get_available_server_channel(sockfd._sock)
sockfd.bind(('', port))
socket.bt_advertise_service( u"XYZ", sockfd._sock, True, socket.RFCOMM)
socket.set_security(sockfd._sock, socket.AUTHOR)
sockfd.listen(1)
connection, address = self.sockfd.accept()
while 1:
connection.send('AAA') (not crash) ^_^
data = connection.recv(100)
......
........
// in my client
.........
sockfd.recv(10)
sockfd.send('any text')
...........
does anybody know a better solution ??
my solution is not perfect, IMHO....

sorry for my english ^_^

This conversation taken from a nokia forum.
Nokia 7373 LCD Screen Repair

Nokia 6280 repair

Nokia N82 Disassembly - Repair Tutorial

Nokia Tuner repair

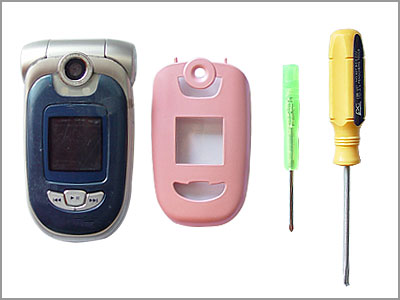
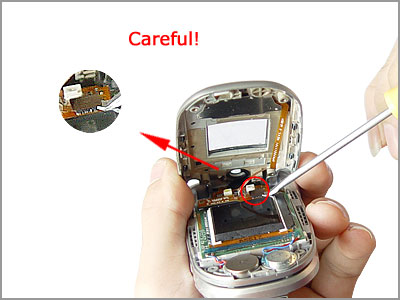
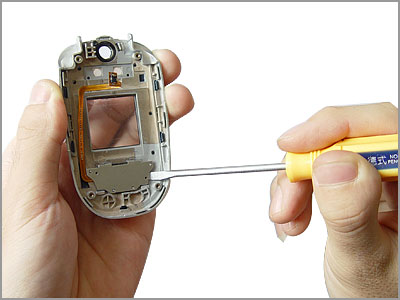
LGVX8100 FULL HOUSING INSTALLATION

LGVX8100 FULL HOUSING INSTALLATION


For example
1
2
3
4
5
6
7
8
9
10
11
12
13

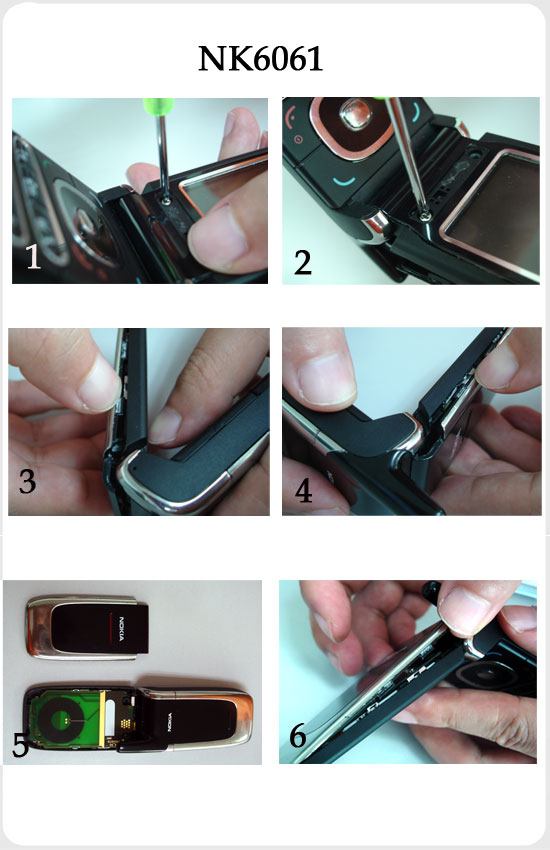
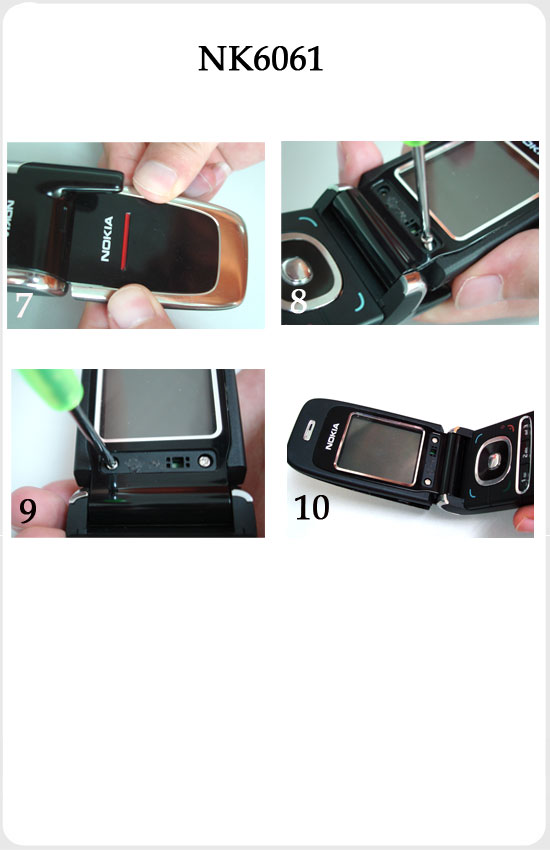
NOKIA-6061 Protector Case

NOKIA6061 Protector Case

NOKIA-6061 Protector Case


iPhone Protecor Case

iPhone Protecor Case Installation Instruction

iPhone Protecor Case Installation Instruction


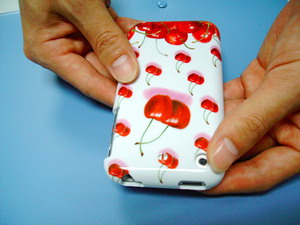
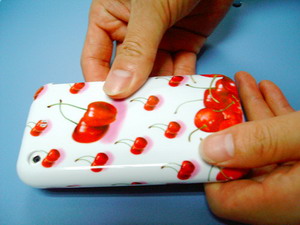
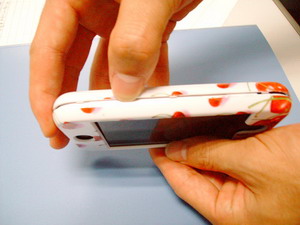
1. Put the iPhone into the front cover of the protector case.
2. Match the lock key window side to the snap joint then buckle it
3. Press the lock key side,then buckle the snap joint of camera side emphatically.
4. Press the lock key side, then move down your hand to press the snap joints tightly.
5. Installation has been finished.

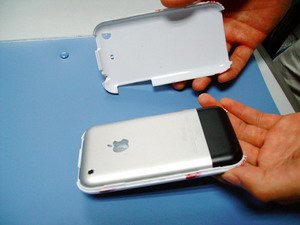
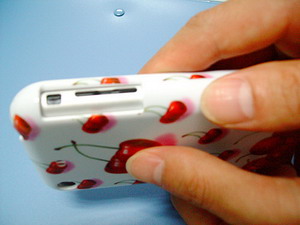
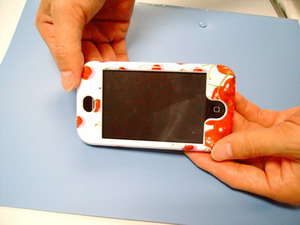
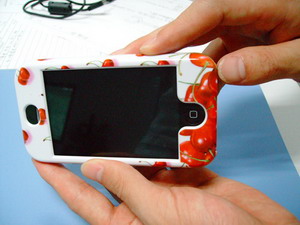
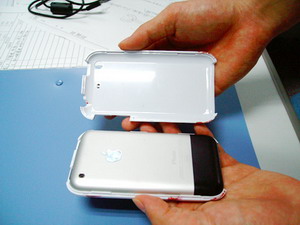
iPhone Protecor Case disassembly Instruction


1. Grasp the iPhone, let the LCD to outside, nip the split of the charger connector, loose one side of the protector case.
2. Push the protector case following the split of the protector case,when you push to the front of the protector case,the snap joint of the side will loose to split.
3. Hold the iPhone with one hand ,grasp the back cover with the other hand, make the front cover and the back cover to be separated absolutely.

 
Mobile Phones Blog | Features,Concepts,Applications and Prices © 2012 | Designed by Cheap TVS, in collaboration with Vegan Breakfast, Royalty Free Images and Live Cricket Score